By John R. Grout. These exercises were written for classes and workshops. The short ones take about 15 minutes each and work well as a warm-up or small-group discussion. The Die Cast Factory case takes longer and asks a team to design mistake-proofing into a product before it ships. The team project sends people out to find the mistake-proofing already in their own workplace.
Look up any unfamiliar terms in the Glossary, or check your understanding first with the Poka-Yoke Quiz.
Short exercises (15 minutes each)
Exercise 1
The low bridge
In December 2002, the Quad Cities Times reported that a beer delivery truck had wedged itself under the railroad bridge at 5th and Brady Streets in Davenport, Iowa. The impact peeled back the top of the trailer, and crews worked all day to free it. Police ticketed the driver for disobeying the sign warning that the bridge clears the pavement by a little more than 11 feet.
It was the ninth truck to hit that bridge since January 1, 2001. Over the same period, nine more trucks hit a similar bridge two blocks away on Harrison Street, even though drivers approaching it see city-installed flashing warning lights in addition to the signs. Drivers heading north on Brady see only a sign with the bridge height.
What would you do to stop trucks from hitting this bridge?
Exercise 2
Smoke detectors
A working smoke detector doubles a person’s chances of surviving a home fire. More than 90 percent of American homes have smoke detectors, but an estimated one-third of those units are either not working or are missing batteries.
Describe any mistake-proofing devices you are aware of for smoke detectors, and propose stronger devices.
Exercise 3
The flying wrench
A worker changes the blade on a table saw. The saw is turned on while the wrench used to change blades is still on the nut next to the blade. The wrench is thrown across the shop. Co-workers say, “Hey, that could have killed somebody!”
What would you do to prevent this accident from happening again?
In-depth exercise: The Die Cast Factory
A product design case. Read the background, study the prototype, then work as a team on the task at the end.
The concept and prototype
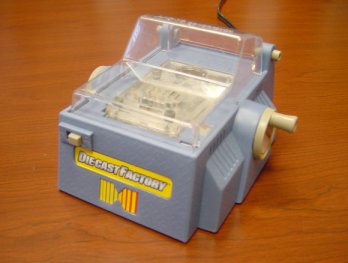
The corporate marketing vice president (VP) charged a new product development team with the task of designing a toy that will allow children to make more toys. The VP has fond memories of playing with his Creepy Crawlers set (described below) as a child and wants to provide the next generation with such memories. The new product development team has created a concept and built a prototype. The concept is a product that allows children to heat metal until it becomes molten, pour it into a mold, and create a small toy or piece of jewelry in the process. The prototype created by the team is shown in Figure 1.
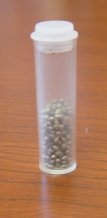
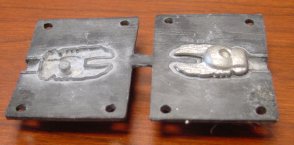
The team has identified a metal to be used that comes in pellet form and has a low melting point. A sample of the metal pellets is shown in Figure 2. The molds of the prototype are a synthetic rubber and are shown with a part in one of the mold halves in Figure 3. Talcum powder is used as a mold release agent to insure that the metal does not bond to the rubber mold.
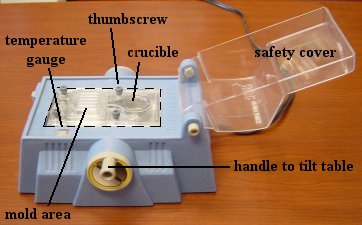
The two-part rubber mold is mounted and held in place on a tilting table (roughly outlined by a dashed line in Figure 4). The metal pellets are poured into a small crucible that is held by screws to the same tilting table. A heating element is located directly below the crucible. Once the metal becomes molten, the table is tilted so the metal flows into the mold. The table remains tilted until the metal in the mold is cooled. The table can then be tilted back and the cast item removed.
Show the 14-step user instructions for the prototype
Use these instructions to find the steps where a child could make a mistake, and where a mistake could cause a burn.
- Place your Die Cast Factory on a safe, dry, flat working surface and have an adult plug it in.
- Choose a mold for the figure you want to cast. Place the mold on your work surface with the insides of the mold halves facing up. With your mold powder and applicator brush, lightly dust the inside of the mold with powder. Shake any excess powder from the mold before continuing.
- Open the clear top of your Die Cast Factory. Remove the top cover of the tilt plate by unscrewing the 4 thumbscrews and lifting the plate up (don’t lose the screws!). This will expose the mold holding area and the crucible.
- Place the bottom half of the mold into the bottom of the mold holder with the arrow pointing towards the crucible. The bottom half goes in with the inside (cavity area) facing up. Be sure that the “runner” area of the mold half goes under the “runner” area of the crucible and that the guide posts in the mold holder are through all 4 guide holes.
- Place the top half of the mold directly on top of the bottom half in the mold holder. The top half goes in with the arrows facing the crucible, but with the inside (cavity area) facing down. Make sure the runner area of the mold completely covers the top of the runner on the crucible and that the four guide posts go through the 4 guide holes.
- Pour metal pellets into the crucible. You must never put the pellets into any part of the machine other than the crucible.
- Once the mold halves are in correctly and the crucible is full with one vial of metal pellets, return the tilt plate cover to the machine and tighten down the four thumbscrews completely.
- Close the clear top of the Die Cast Factory.
- Turn the switch on the front of your machine to the “on” position (to the left) and watch the metal melt! It will take approximately 10-12 minutes for the metal to be completely molten.
- Turn the knob toward you in a swift motion (counterclockwise) approximately one half turn. This will flip the tilt plate and pour the molten metal into the mold! Wait 30 seconds after the metal is totally melted before you try pouring. The hotter the metal is, the better your figure will cast!
- Turn the machine’s power switch to the “off” position. Leave the knob turned and the tilt plate tilted until the unit cools. This will take approximately 10-12 minutes. The tilt plate must stay tilted while cooling.
- Do not open the clear cover until the machine is completely cooled down. After cooling, you can see an arrow pointing to the cool area inside the temperature indicator chart. Then crank the tilt plate down by turning away from you (clockwise) approximately one half turn before you open the clear cover.
- Remove the 4 thumbscrews from the tilt plate cover and lift the cover off.
- Remove the top half of the mold, then the bottom half along with the molded figure. The figure may still be warm – use care in handling.
A brief history of “hot stuff” for kids
In the sixties, one of the first toys that involved forming toys using heat was called Vac-U-Form. It heated plastic until it was very soft and pliable. The plastic was flipped off the heater onto a mold, and a small vacuum pulled the plastic over the mold. After it cooled, the plastic could be cut out and assembled into toys. The heating element and partially melted plastic were not protected. Burns resulted, but most families at that time understood that minor burns were an “occupational hazard” associated with any such toy.
Shortly after the Vac-U-Form, Mattel released a product called Creepy Crawlers. It allowed children to pour plastic “goop” into metal molds that were baked on a specially designed hot plate. A cooling tray filled with water was used to cool the mold and allow nearly immediate removal of the toy from the mold.
Creepy Crawlers is similar to the Vac-U-Form in that safeguards against children burning themselves are minimal. The temperatures used on these devices generally cause first-degree burns but could, in the worst cases, cause second-degree burns.
Product design issues
The corporate legal department is concerned that consumers and the public will not respond to children burning themselves the way they did in the 1960s. During the intervening 40 years, corporations have seen a rising propensity among consumers to litigate when injuries result from the use of products. This is true even when the customer makes a mistake using the product. Furthermore, the burns resulting from molten metal will be worse than for previous products, which used plastics. The injuries that result from direct contact with molten metal will certainly be second-degree and possibly third-degree burns.
The marketing department’s representative on the design team is concerned that the product will not sell effectively if it costs more than $35. Design changes that enhance safety but drive cost significantly higher will hurt the profitability of the product.
If the product is to be approved by the legal department, efforts must be made to insure the product can only be used properly and safely. If a child is injured, it must be the result of clear, demonstrable efforts to circumvent safety features that are inherent in the product. However, these features cannot have a significant impact on per-unit cost.
Your task
The new product design team must now enhance their current design (as represented by the prototype) to meet these additional requirements. Determine what mistake-proofing features are necessary for this product to avoid undue product liability, and suggest ways of accomplishing this mistake-proofing at minimal cost.
Team project: find the mistake-proofing you already have
Exercise 4
The mistake-proofing scavenger hunt
John wrote this briefing for hospital departments, but it works for any team. Mistake-proofing devices are usually simple, inexpensive, and easy to use. They let a process run smoothly, but as soon as a mistake is detected, the process stops or the problem gets someone’s attention right away. Some devices prevent a problem from occurring. Others keep a defect from moving on to the next step.
The goal is to find as many examples as possible in your own operation. If you’re not sure something qualifies, include it. It’s better to eliminate it later than to never consider it. Be especially sure to look at the simplest tasks in your department.
Everyday examples to get you started:
- Most newer lawnmowers have a safety handle that shuts off the engine when you let go.
- Sinks have a hole near the top to prevent overflows.
- A clothes dryer shuts off when the door is opened.
- Many irons shut off automatically when they haven’t been used for a while.
- Public restrooms use sensors so faucets aren’t left running and toilets get flushed.
- Elevator doors have sensors that detect people in the way.
- A phone’s SIM card has one clipped corner, so it fits into its tray only one way.
Walk through your area and record every mistake-proofing device you find on a submission sheet: the department, the item, and a brief description of how the device works with the equipment or process. To go further, use the FMEA form to list how one process could fail, and check which of those failures your devices actually catch.
Found a good one? Send it in for possible inclusion on the site.
Keep going
Compare your ideas with real devices, and see why warning signs alone rarely work at BeMoreCareful.com.

About John Grout. John R. Grout is Professor of Business Administration Emeritus and former dean of the Campbell School of Business at Berry College. He founded MistakeProofing.com, wrote AHRQ’s Mistake-Proofing the Design of Health Care Processes (2007), and received a 2004 Shingo Prize with Douglas Stewart for The Human Side of Mistake-Proofing.